

Ah summer…to me this season means lots of time dyeing and printing fabrics outdoors, and this summer I’m trying my hand (for the very first time) at indigo dyeing. As someone who loves surface design and fabric printing, I don’t know why I haven’t played with this process before as it is extremely gratifying, fun, and easy!
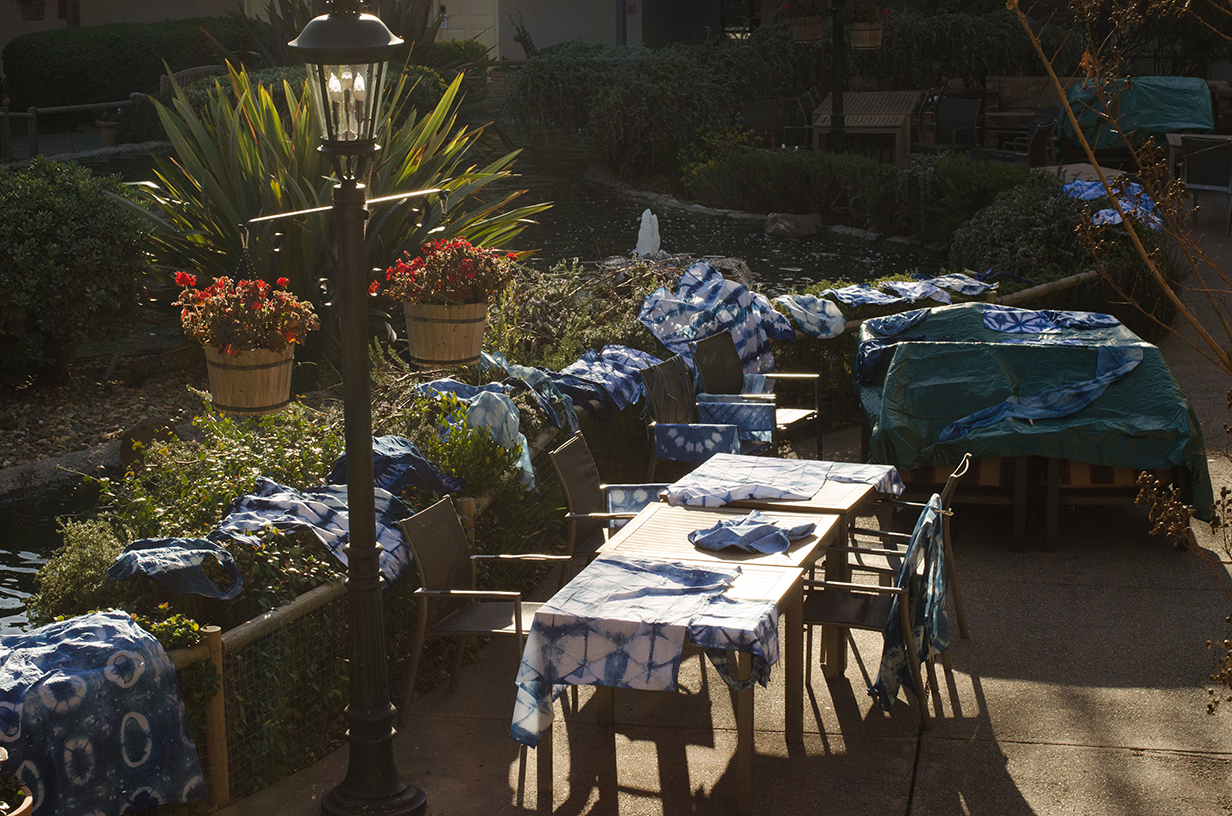
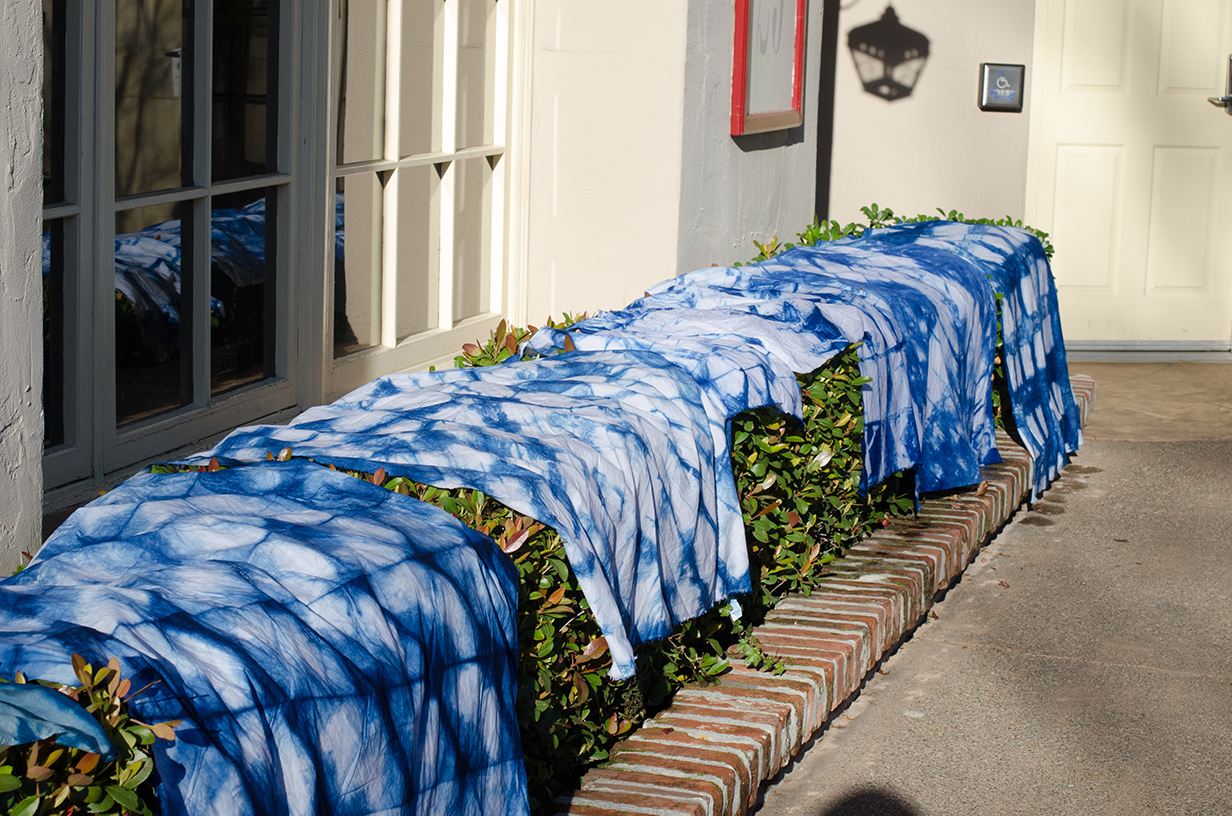
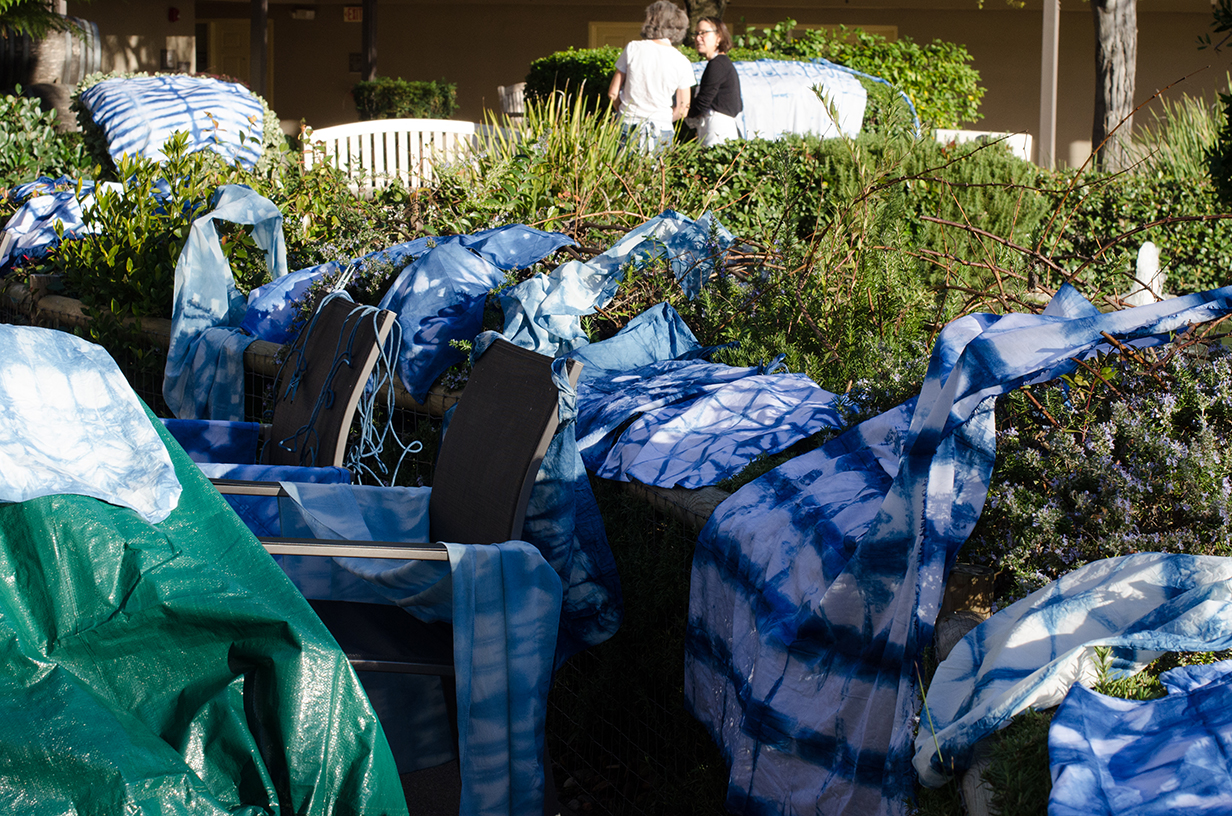
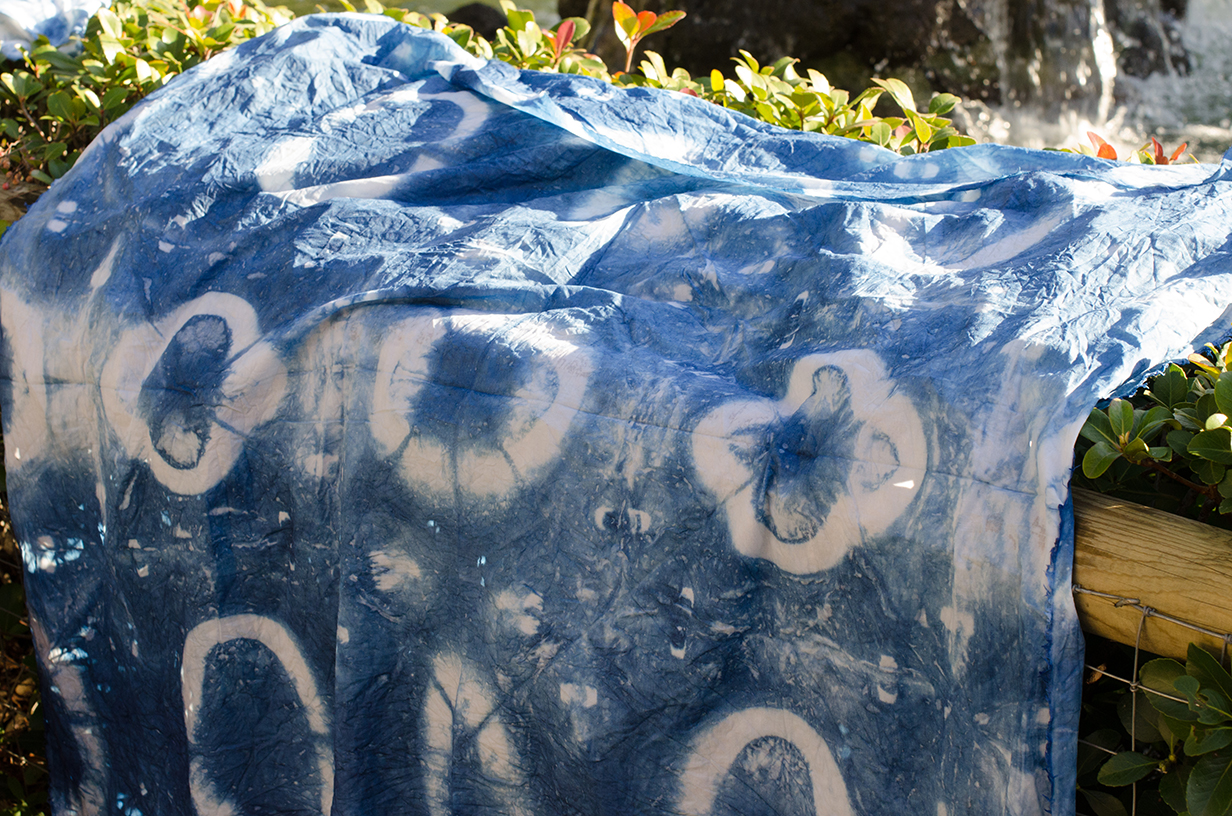
And you don’t need the summer heat to indigo dye, you can do it in winter, of course, too. The picture below was taken this past January at Craft Napa in the outdoor courtyard of the Embassy Suites/Napa. We quite literally took over the entire hotel, drying fabrics indoors and out. Below are some images of fabrics drying everywhere at the hotel from Sandra Johnson’s Craft Napa Indigo & Shibori workshop.
We draped the bushes too…
And all of the outdoor furniture. (All were unharmed afterwards, I promise.)
This kit (below) is what was used for indigo dyeing, which I recently bought too so I could give a go at this process. It is a dye kit by Jacquard that we got from Dharma Trading, and it’s so cheap (only $9)! This kit includes all of the ingredients, conveniently measured so all you have to do is pour everything provided in the kit (wearing your protective gloves and gear) into a five-gallon bucket of warm water. This mix can dye up to $15 yards of fabric, too! There is a lot of value packed into this tiny box, and when covered when not dyeing, can last for days:
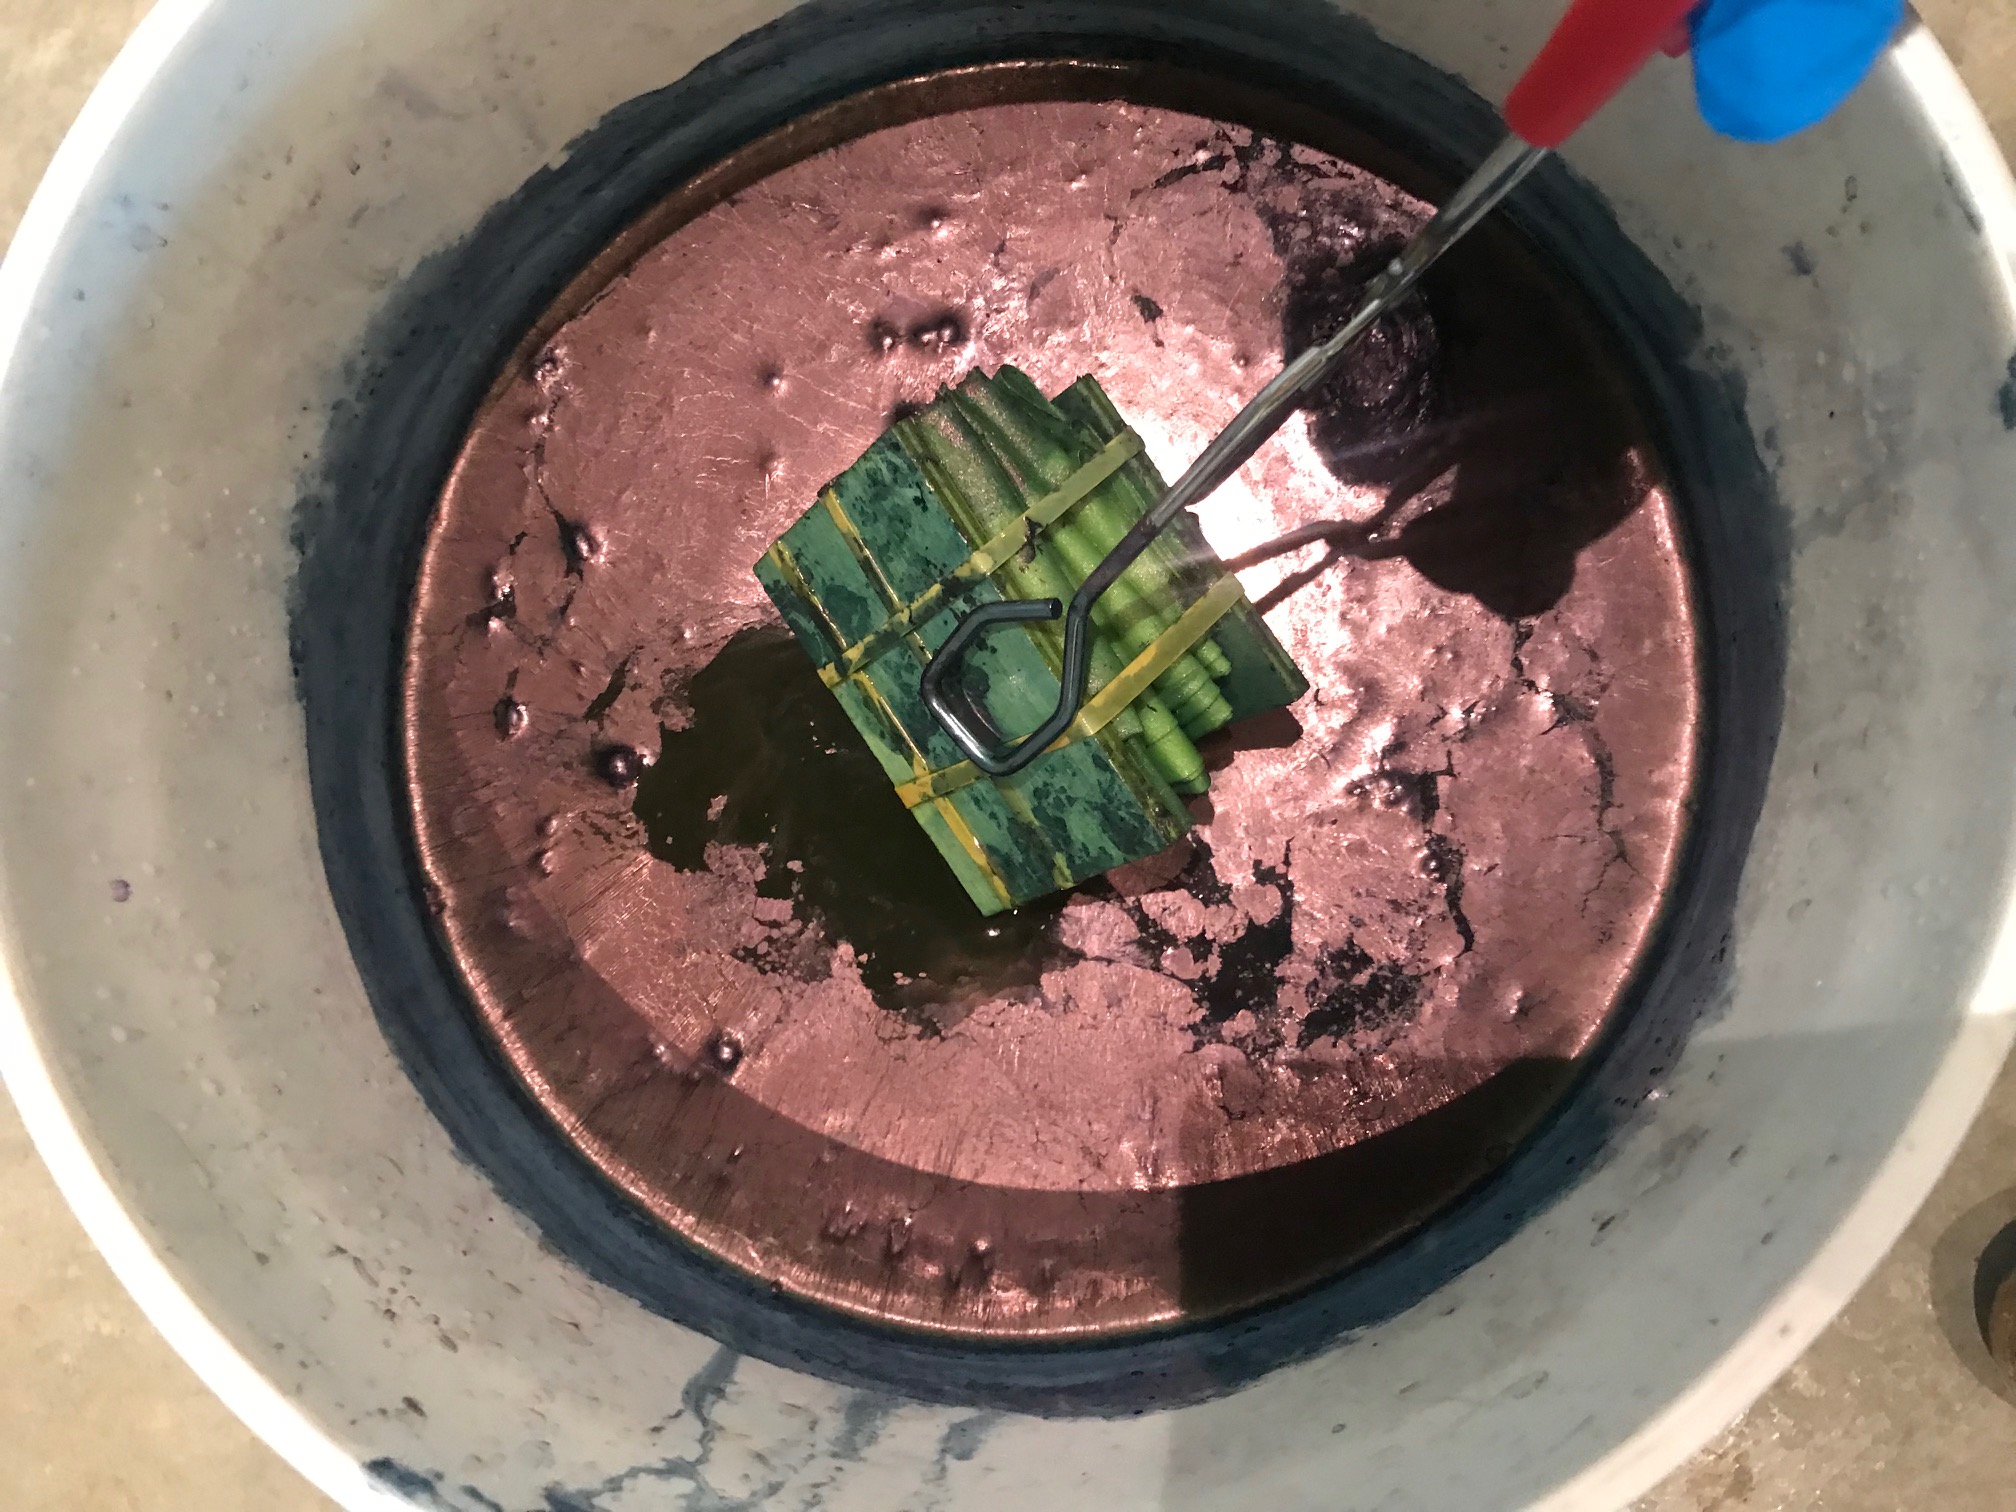
This is what it looks like when all of the ingredients are poured into a five-gallon bucket of warm water. The top of the dye vat has a bit of a film on it–it looks a little strange but it’s normal. And when you fold the fabric and clamp it (as shown below), everything emerges as green; it’s the oxidation process that turns the fabric blue.
Below are some first samples of mine drying in the sun:
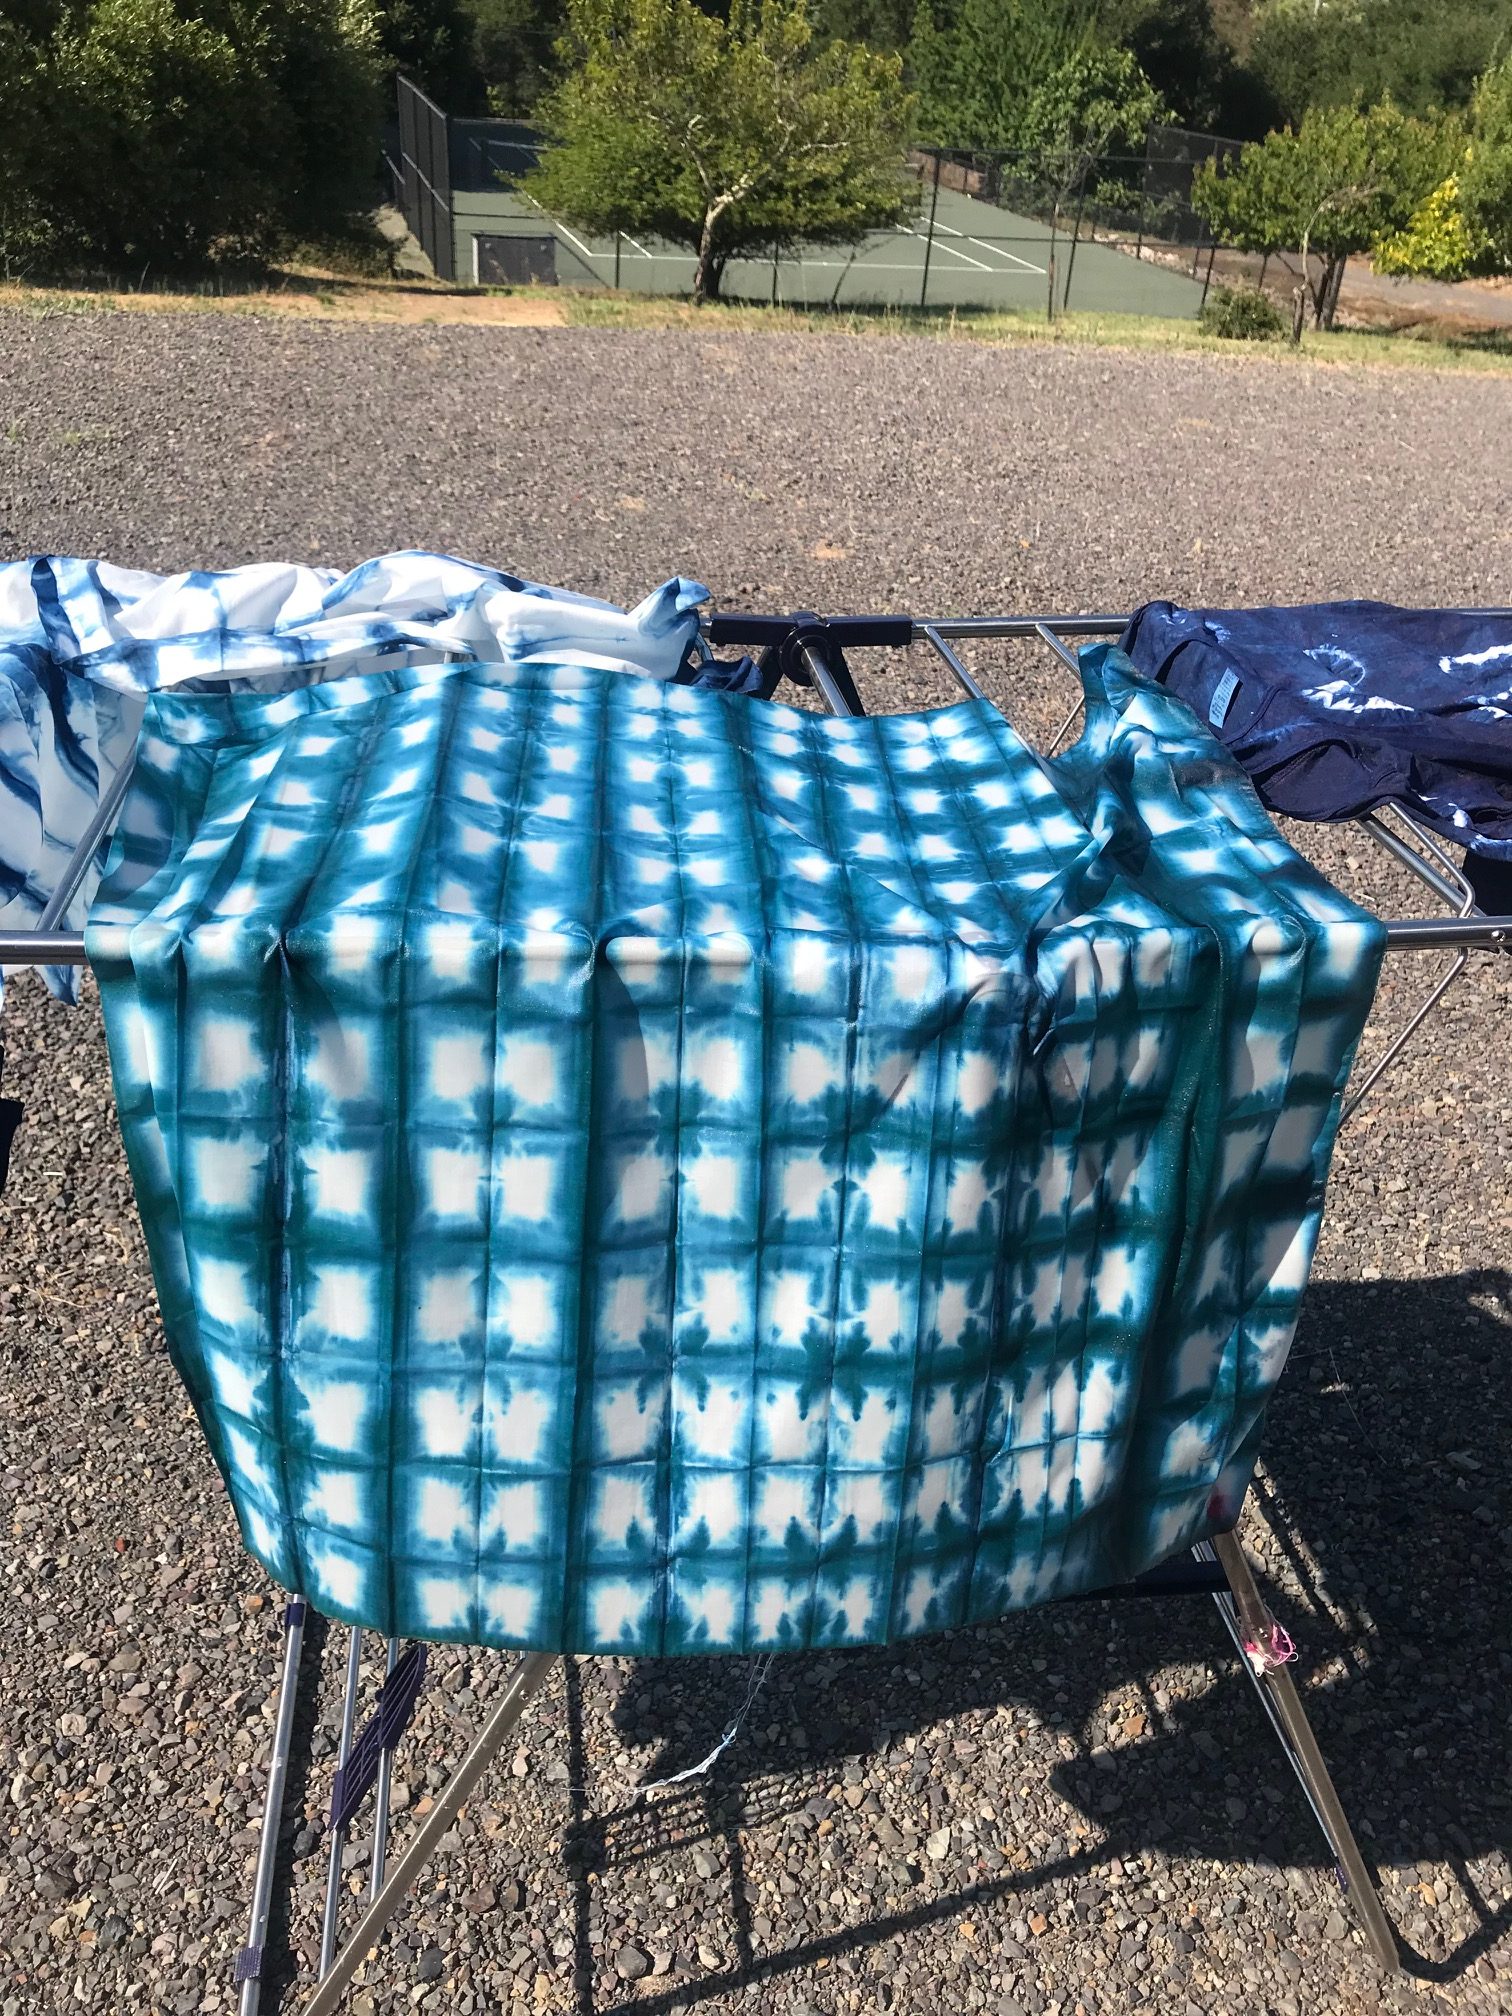
They get bluer as they dry:

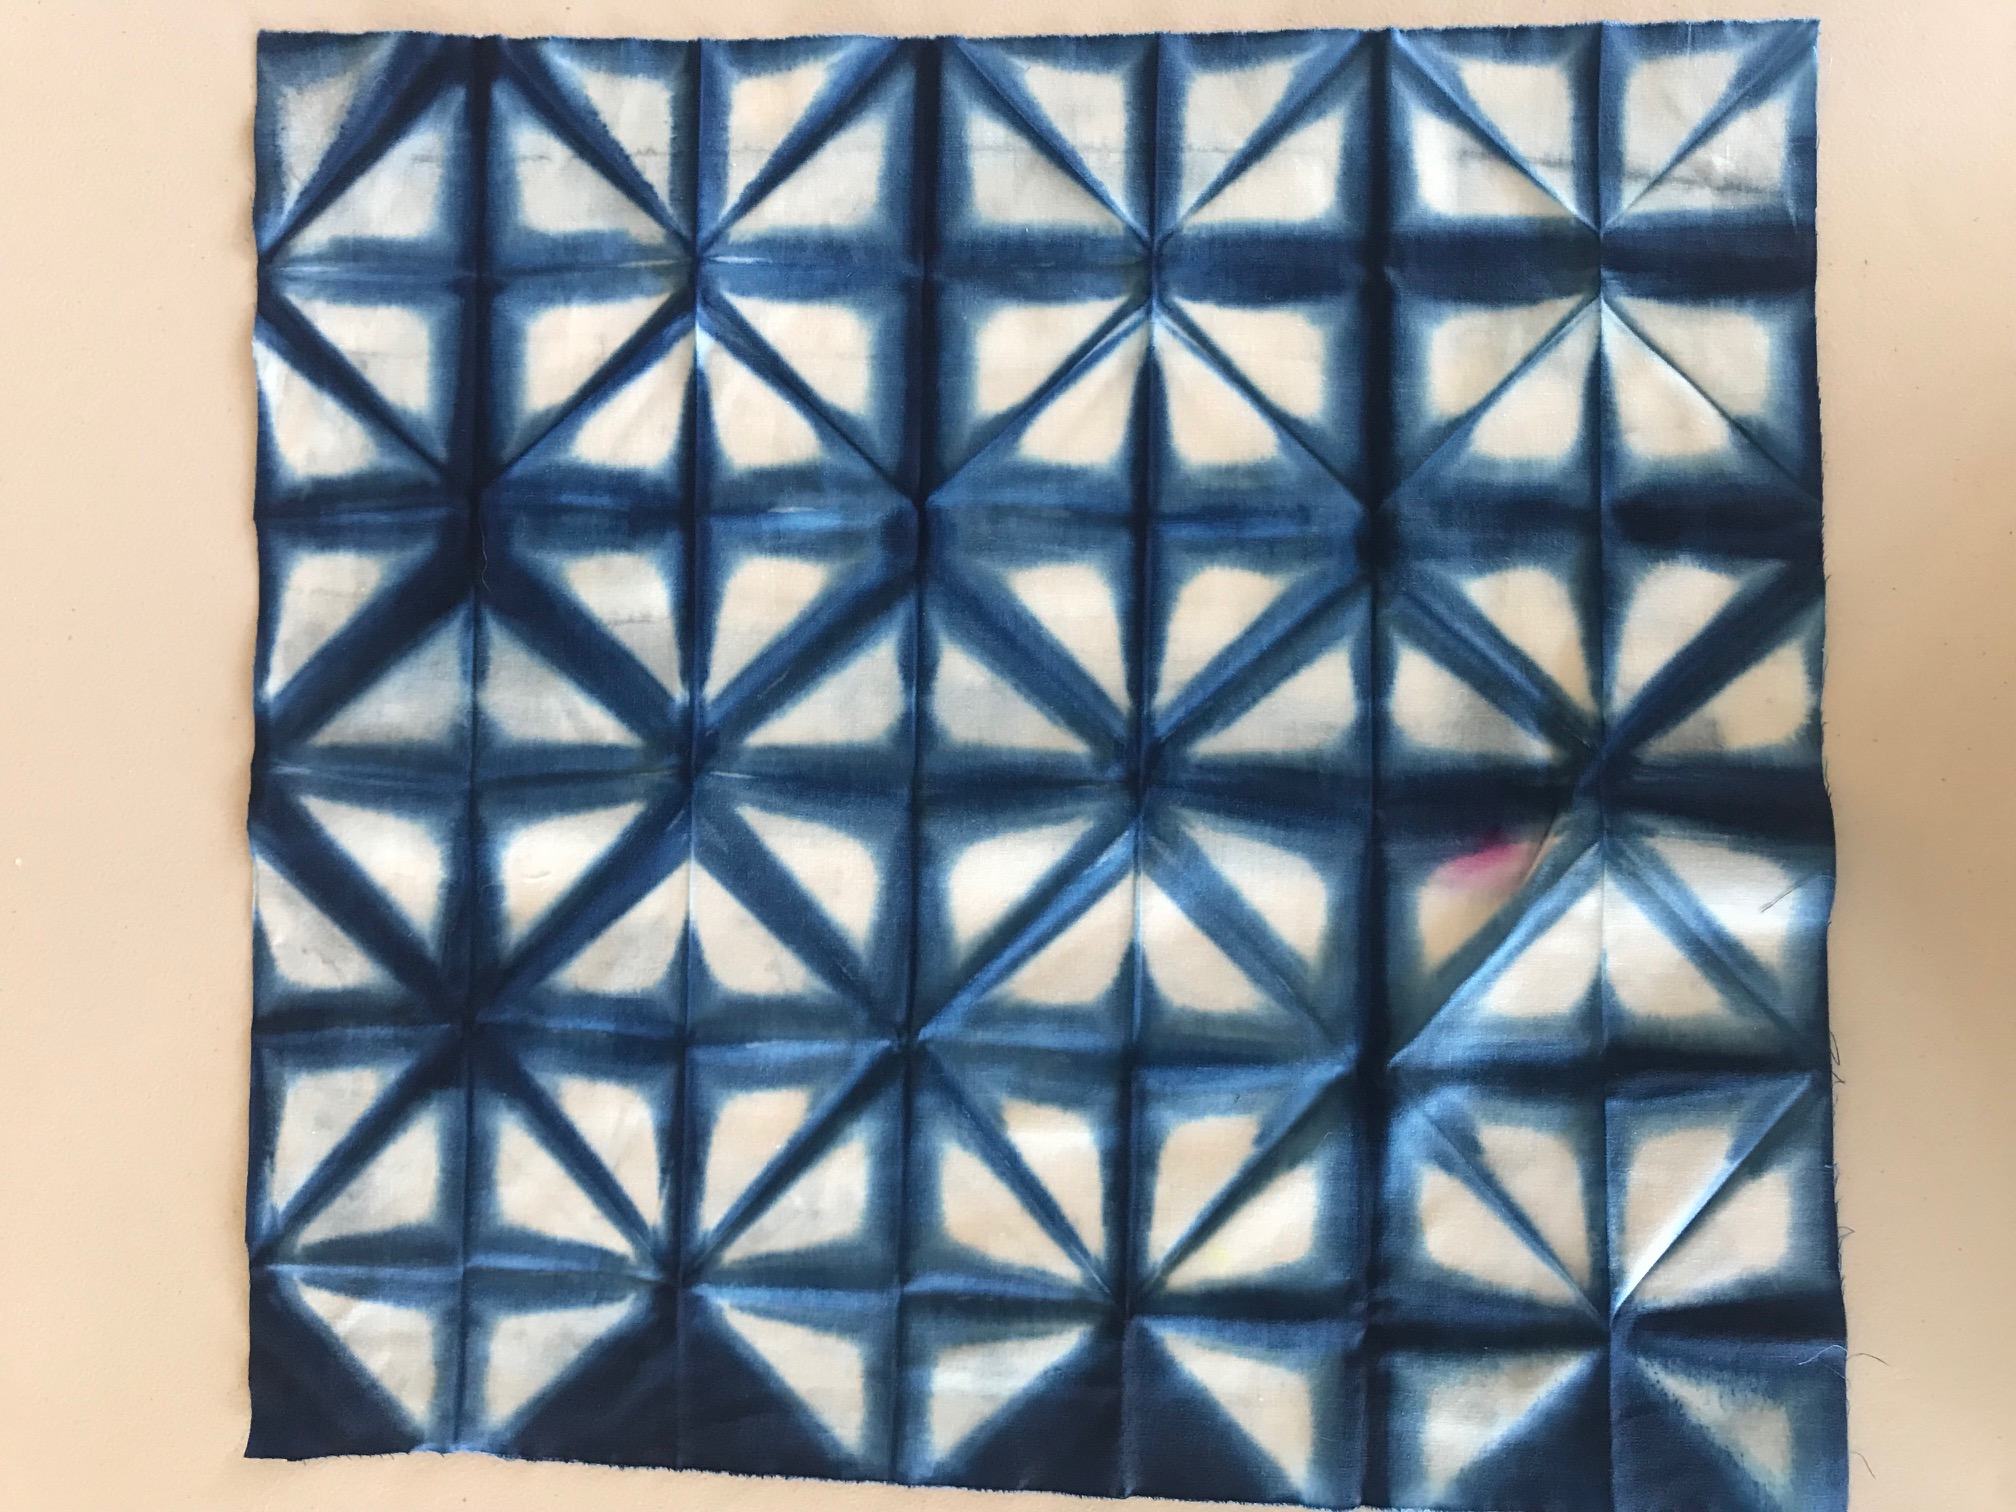
Below was a very simple, accordion and triangular folding process I used, but it yields such amazing, graphic results! (And note to dyers: if you are going to indigo dye, set aside a special dye bucket for this. I had used this same bucket for Procion-dyeing and evidently had leftover pink dye in it…hence the pink spot on the lower right side.)
I also bought a blank cold-shoulder t-shirt from Dharma Trading and tried my hand at what is called kumo (basically wrapping an object with rubber bands to resist-dye). I just used rocks from my gravel driveway for this experiment:
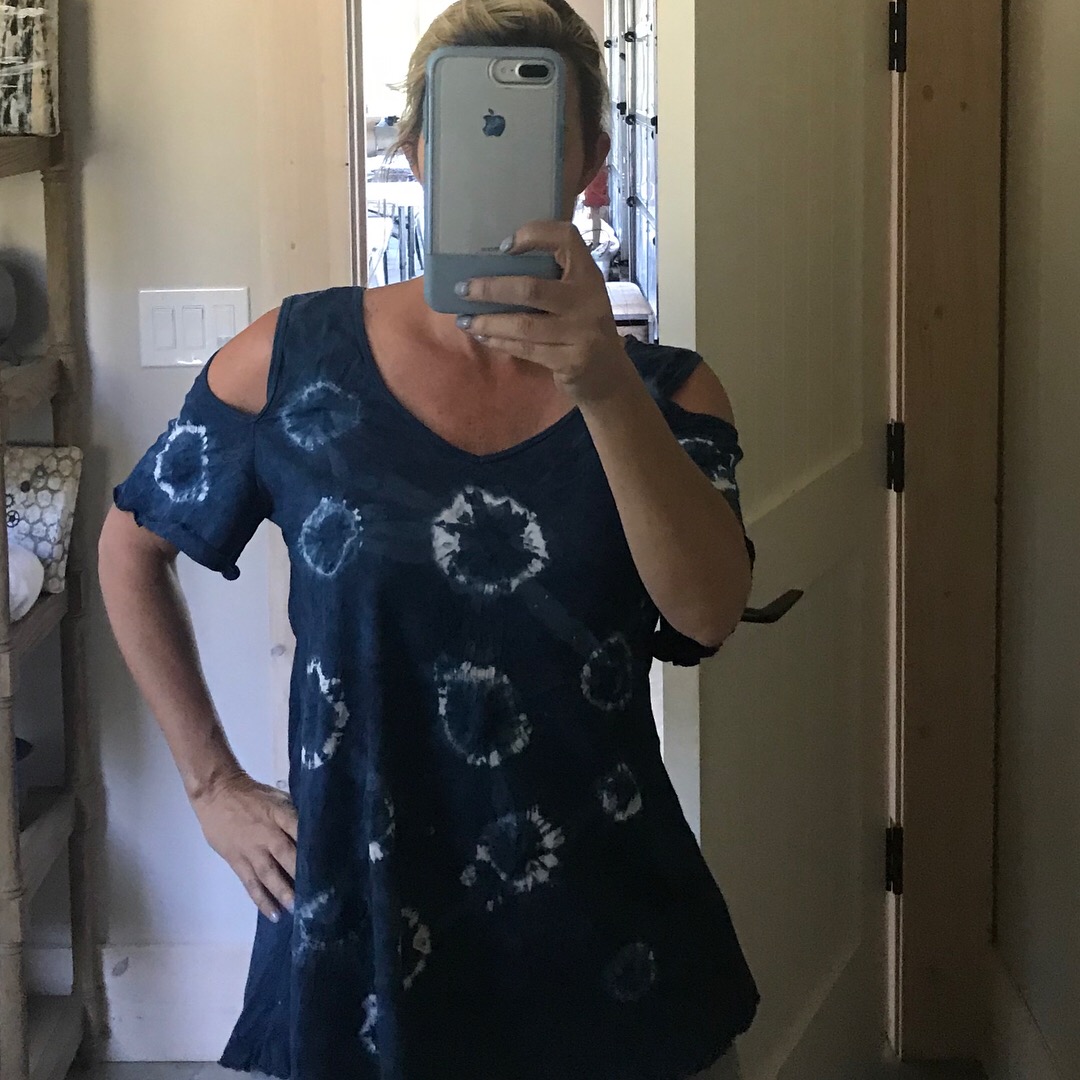
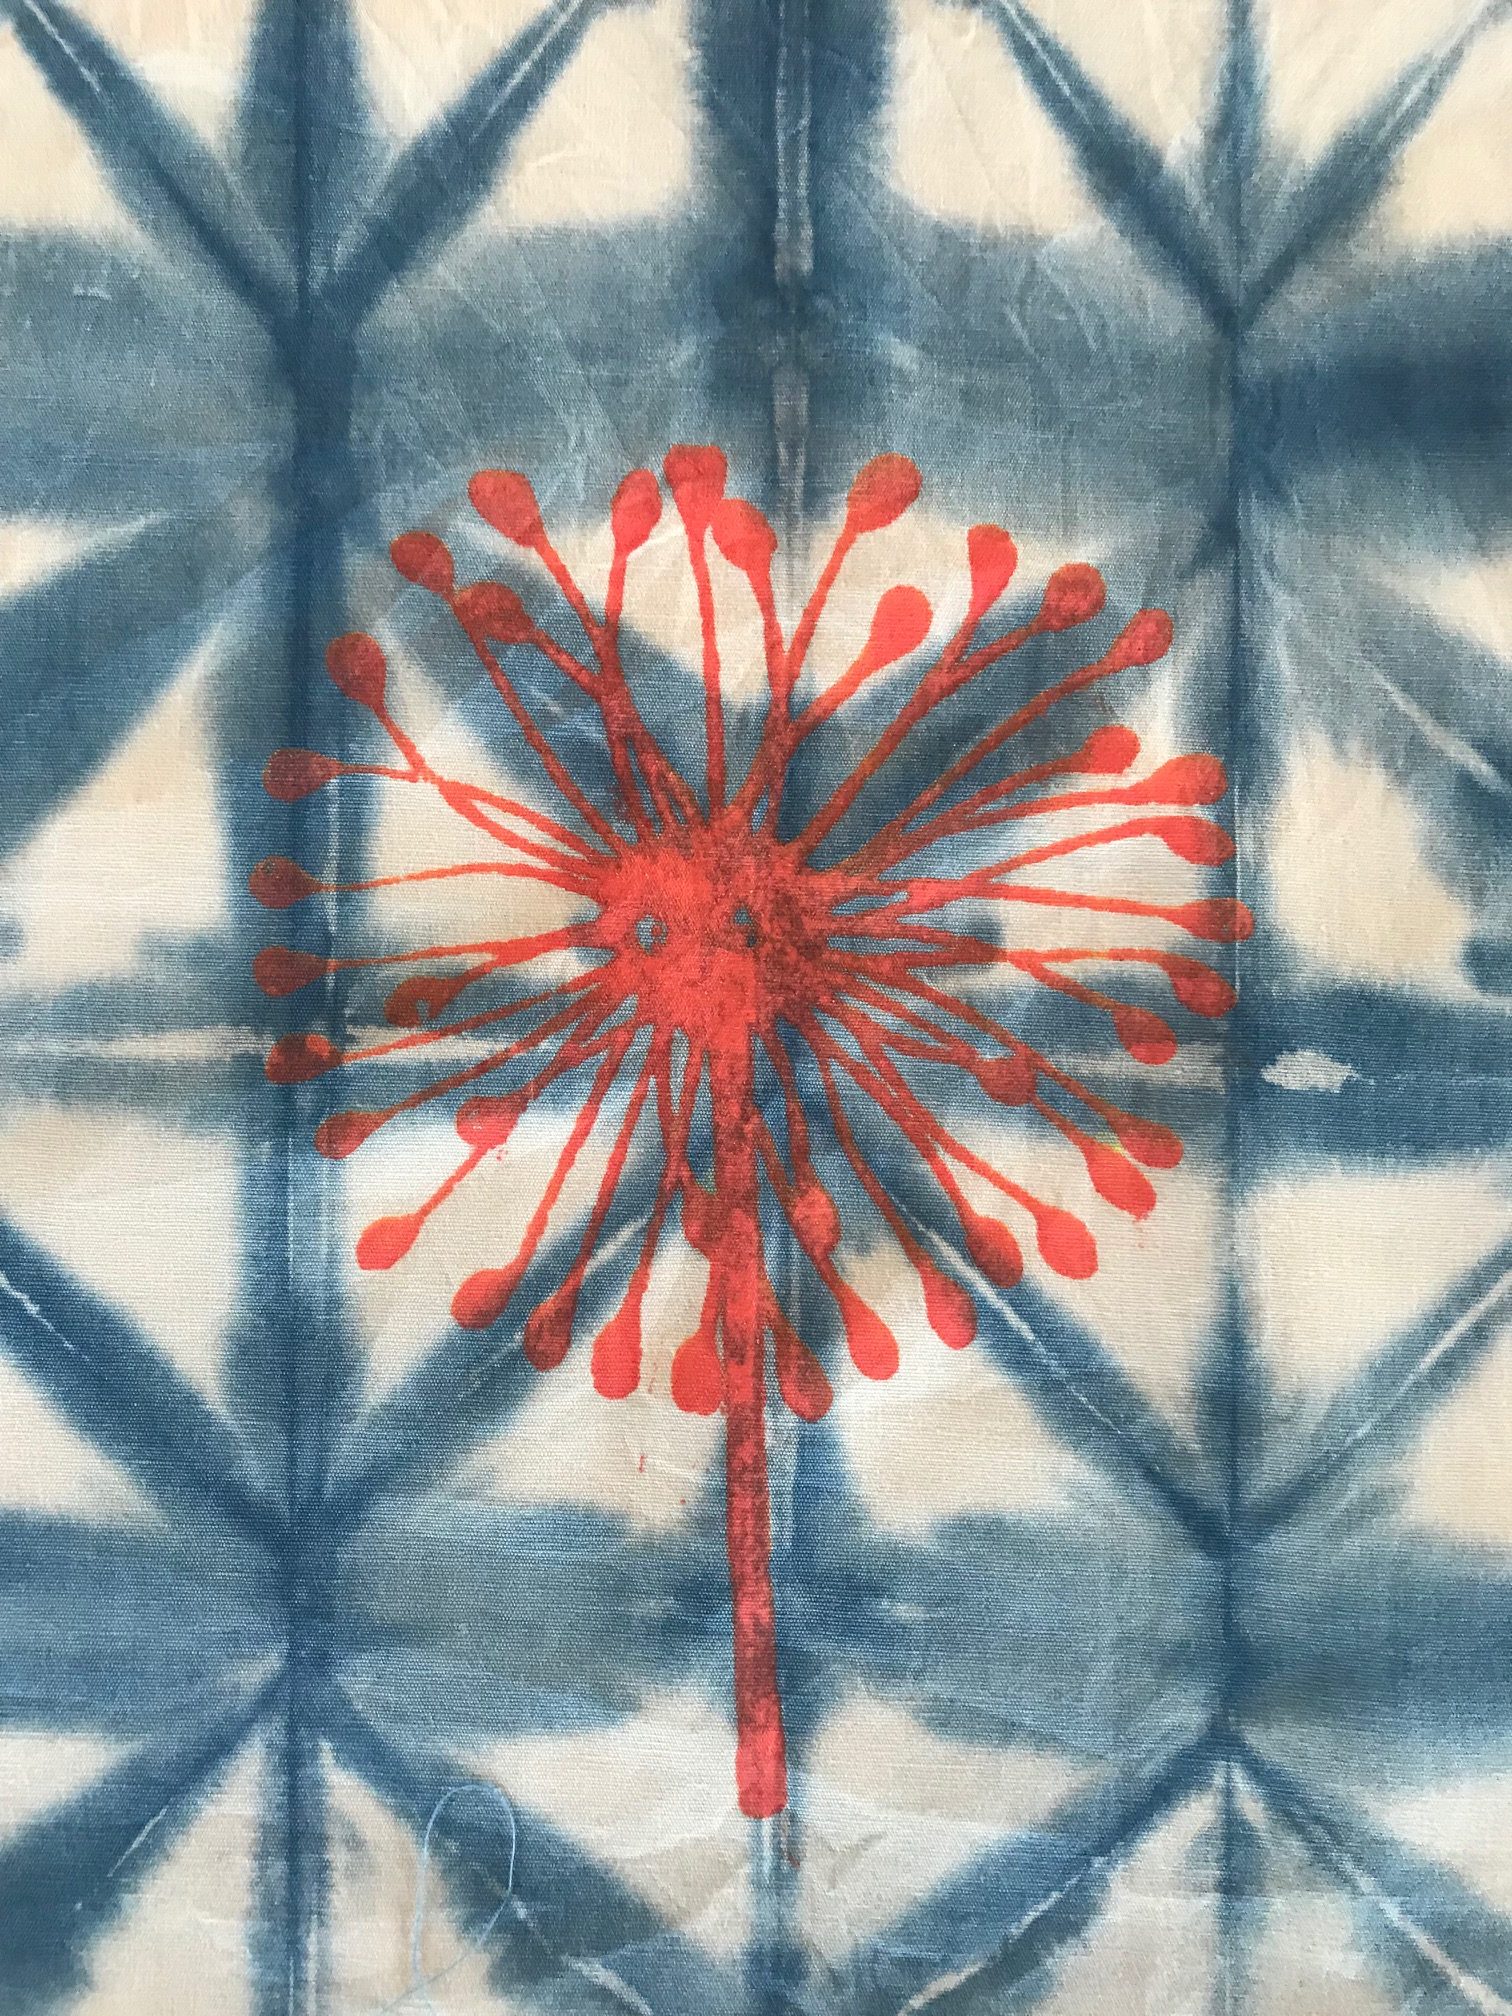
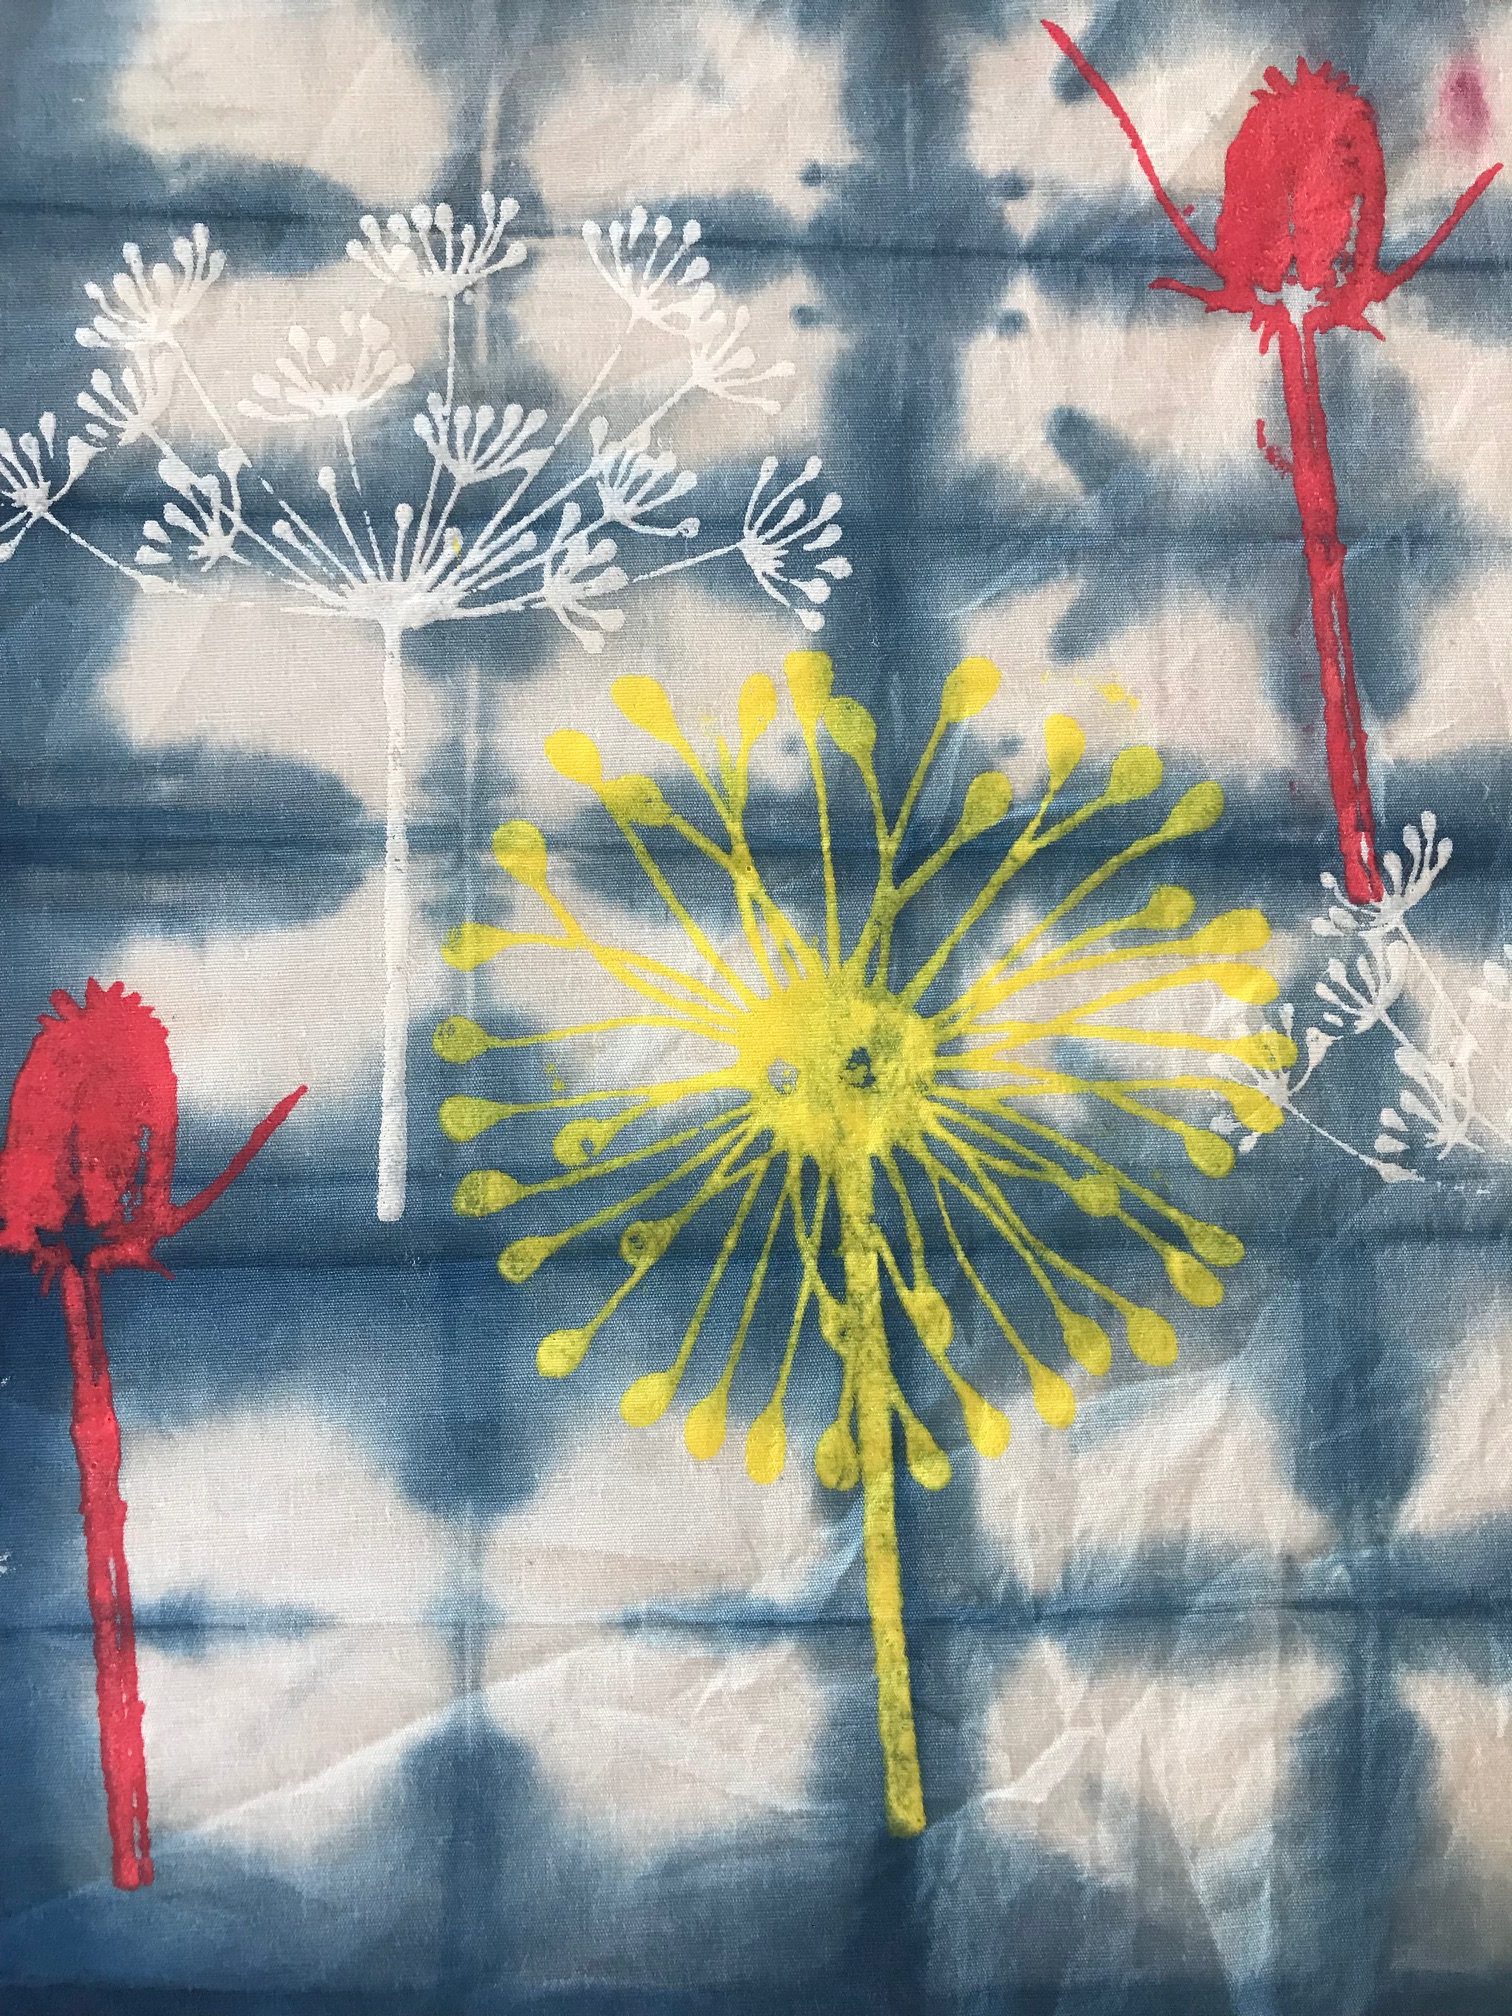
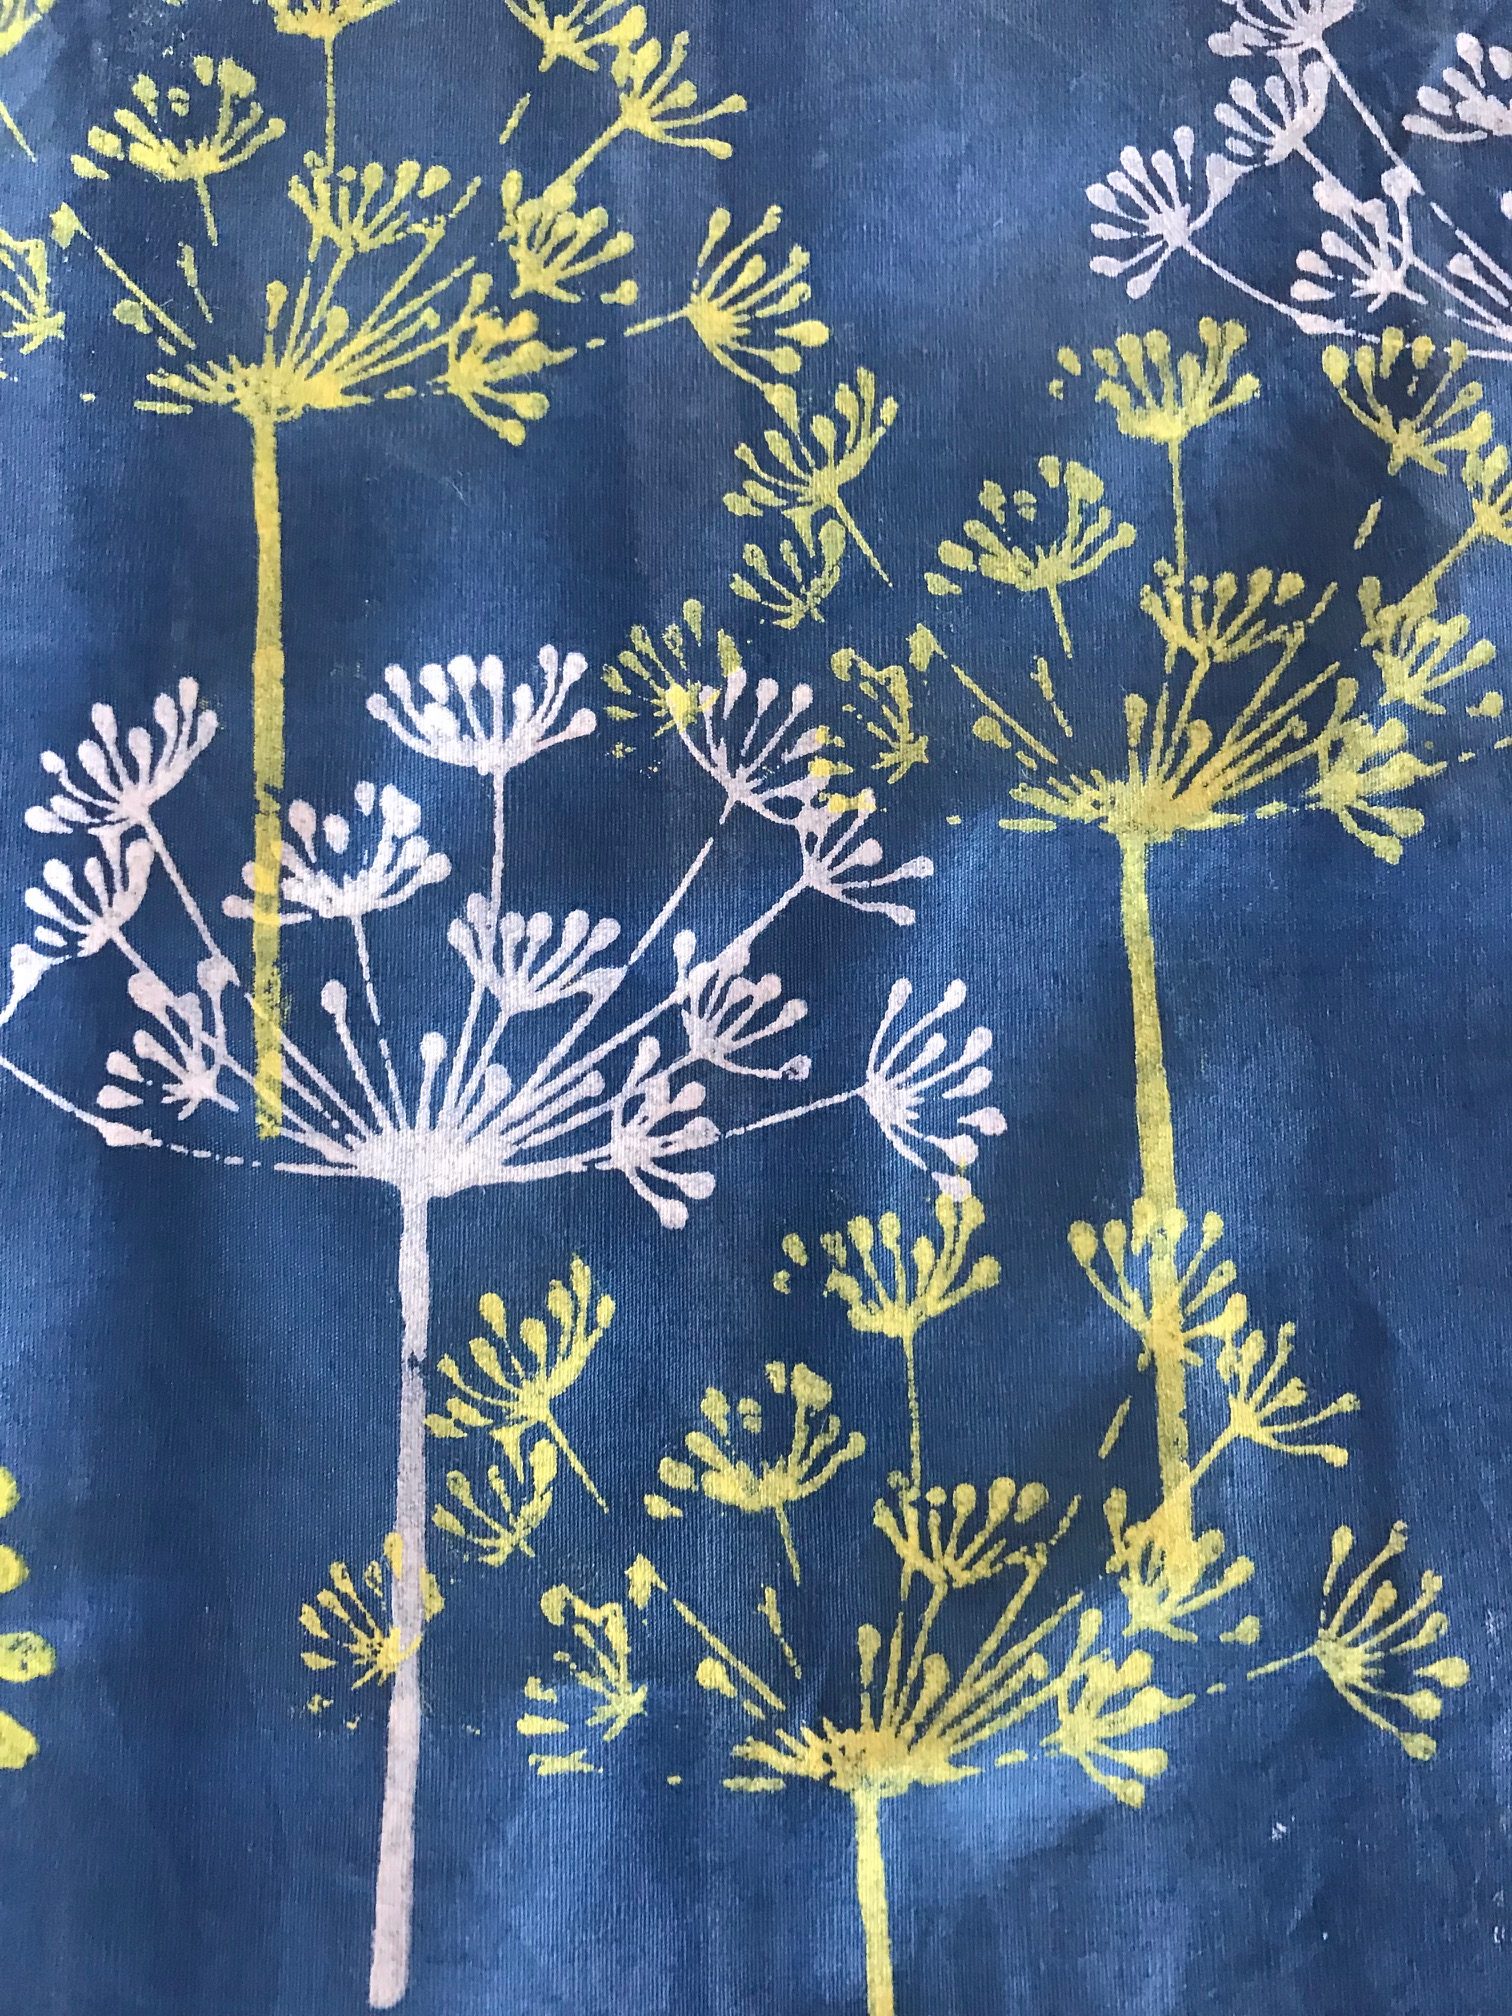
And then I also tried some screen printing of imagery on top to get more layered effects:
This is just the beginning of indigo work for me, and I cannot wait to really explore this process, and also try traditional stitched, shibori techniques.
A couple of Youtube videos for this process that I found helpful:
Sandra Johnson will be teaching not one but two Shibori classes at Craft Napa this next January, and you can find more information here! She still has a few spots left in both workshops.
I am also really pleased that Dharma Trading (in neighboring San Rafael) is joining the sponsorship team at Craft Napa by providing product for teachers and doing live dyeing and fabric printing demonstrations during all of Craft Napa next January!
Indigo Kit Giveaway!
To celebrate the love of indigo dyeing, I am giving away an Indigo Dye Kit (as shown above). Here’s how to play: Answer the following question (in the comments section for this post), and I will randomly select a winner this next Tuesday (July 17th). This is a global opportunity; everyone (within the U.S. and beyond) is invited to participate. On Tuesday, I will update this entry with the winner’s name. Good luck!
Question:
What have you learned lately (or maybe revisiting) that is fueling your creativity at the moment?
Happy Creating!
~Pokey
UPDATE: Congratulations to Sherri Cox–you are the winner of the Indigo Dye kit! Please email me at info@craftingalifellc.com and I will ship it out to you directly!


I learned that I could look at a picture of a blue and natural colonial plaid and use it as an inspiration for a weaving project. I’m very proud of how the fabric turned out.
What I have learned lately is the vast information on the Log Cabin quilt block which is older than the USA civil war period. It dates back to Egyptian mummy wrappings as well as Japan. The West African Igbo practice facial scars that are cultural that have log cabin design. As an symbol for Underground Railroad quilts, the center color symbolizes messages.
Taking a pottery cIass and I learned throwing pottery on a wheel is so much harder than it looks. Not giving up
I keep thinking about doing some indigo dyeing and your post today gives me just the push I needed… ordering the kit from Dharma and have some time in August when I can play.
Thanks Pokey
Continue to work at it. It doesn’t all have to be great. Sometimes the not so great result leads to the next period of growth.
I am loving gelli plate printing this summer! I would love to try indigo dying. I have sees it but never tried it.
Revisiting ice dyeing with focus on exploring the different effects given type of fabric/when soda ash is used/whether dye is put on the fabric or on the ice, etc.
I have been doing Indigo dyeing. I have been learning new Shibori designs and playing around with flowers. It is so much fun. And so much to learn.
I recently tried flour paste resist, fun, easy&some cool results!
I have tried dyeing and printing for the first time, and am looking forward to getting better! I used a chop to print on canvas, found an unexpected repeat and now have a great background ready for my next project — a quilt featuring Dusty Dog, my boisterously curious boy.
I’ve started ice-dyeing some fabric this past week. With all of the hot weather, it seemed like a good way to cool off ! Love your indigo fabrics!
I just finished a stenciling workshop with April Sproule. The stencils would look great on indigo fabrics!
I have done some tie-dying many years ago and would love to try ice-dying! It’s creative and the results are always an element of surprise…. love that about it!
Just signed up for Craftsy Unlimited, and I’m binging on all their classes, although doing more watching than creating. Ready to make my first wallet, but now I want to make it with indigo dyed fabric!
I went to a class on how to use colored pencils to fill a design, how to shadow the design, and then how to set it with a special product I painted on it and then set the design by covering it with parchment and applying heat to it with a hot iron. It came out great and now I am going to design an edge for it and make it into a wall hanging. It was tedious but great fun!
After a loss so deep, I have learned that I can come out of the depths of grief to open my heart and hands to life as it is now, welcoming the return of light and joy to my life. Today I began to sew again and felt the warmth and comfort of working with needle and thread begin to bring me back to my creative life.
I am glad you are finding comfort and a bit of joy in sewing again, Ruth. My best to you,
Taking pictures of the flowers in my garden with my phone is inspiring me to try more raw edged applique and ysibg my hand dyed fabrics.
Sounds like fun!
I just started appliqueing. I am very slow but am learning the process
I’m working on a quilt from my own photo. Turned out to be quite a bit more complicated t6han I had thought, but I have the top done!
I have been overdyeing previously dyed and painted scarves. The resukts have given me tge most excitement I’ve had about my work in ages.
I am learning to take greater risks with my art, to step into the unknown and with this, realizing it is the journey of discovery and exploring that feeds my soul, rather than a perfect outcome! It is taking me to the inner perfectionist and meeting it with kindness, firmness, and a greater allowance to discover something new and fresh.
I have struggled to understand color theory. I don’t know why, but it is true. As I was driving to work the other day, I could see beautiful wildflowers along the highway. I was reminded that all I have to do is look at God’s creation to see the beautiful color combination possibilities.
I agree…nature seems to have color theory and the rudiments of the color wheel down quite well! 🙂
I quilt. I have revisited hand stitching with bias strip applique.
I must tell you, I think the screen printing on the indygo dyed fabric is just wonderful. I would like to try the technique. In the past I have purchased from Dharma Trading and appreciate your blog reminding me of it.
Oh, I am glad my blog reminded you. I am telling you, I am having so much fun with this…
I learned that my postponement of creative activities cannot just be blamed on my work distractions, because I am now retired. I actually chose to stop doing textile related experiments and became a gardening monster for two months straight. I think I needed to think a bit about why I am doing art and where I expect it to go. There were no real “aha!” moments, but now the yard looks a lot better, I’ve lost a bit of weight, and I’m starting to play with my crafts/art again. For me, creativity can’t be turned on full bore for month after month; life requires balance.
Liz, I totally agree. Sometimes I go for a long while without creating in textiles, but I find my mojo in other ways…like gardening. You are right, it is all about balance.
This is a “remembering” rather than something newly learned — patience is a blessing!
I learned that no matter what I’m going through at the moment I can go in my sewing room to relax. While what I create may not be the greatest project it is what I needed so I don’t go crazy.
After a long period of un-creativity after the passing of my husband I was ready to jump in again. Nothing happened. It wasn’t fun. A discussion with a single friend who also loves to create and was in a similar funk revealed to each of us that our “aloneness” was a stumbling block. There is no-one at hand with which to share our processes and projects, our failures and our successes. My single situation isn’t likely to change any time soon so I am needing to adapt mentally to re-ignite the spark. Knowing what the stumbling block is opened the door to getting back into the groove. I am once again excited about playing!
I am so sorry for the passing of your husband, Sue My sincere condolences to you. And I understand, albeit a different situation. I got divorced about six years ago; I almost can’t believe that much time has gone by, but it is fair to say I was in a creative funk for a long while. I think connecting with friends/ creatives in similar situations is so, so helpful. And when you get that spark…and eager to play again and create, it truly is the BEST. 🙂
Upcycling/Scraps
I recently painted the hem of my niece’s wedding dress in desert sunset colors-so happy to tell it was lovely! Whew! I used silk fabric paint from ProChem.
That sounds very beautiful and interesting!
I’ve learned to stop asking myself “why.” Now I ask myself “why not.”
Actually, things have been a bit slow for me lately as I had my first cataract removal a few months ago. I’m now waiting for the second one to be removed & then I’ll be able to get some “cheaters” for reading & sewing & be ready to go! I am ready to make some candy bag zipper bags as soon as I can see more evenly!
I’m having fun making clothes (jacket and now sundresses) by copying favourite clothes that I already own after watching a crafty class that taught me how to make patterns from existing garments. Even a knit fabric dress turned out after watching the Tilton sisters’ class. Maybe the next one will be made from dyed fabric. 😊
I’ve learned to be adventurous and to try new dyeing techniques
Learned to combine water color and color pencils. End up with realistic images. Love it.
That sounds like fun!
It must be the weather. Two months ago our small group played with indigo and rit dye (in scarlet & dark green) and last month we stitched sashiko. I would like to do more of both. The folding is addicting. Love your drying rack Pokey and your screen printing, especially the last one. I’ll have to try Dharma’s kit. Lots of help available on Youtube.
I actually designate summer as my dye season and pretty much stop stitching for the most part! As far as the dye rack, I got mine on Amazon…super cheap and I love it. I think it’s this model: https://www.amazon.com/AmazonBasics-Gullwing-Clothes-Drying-Rack/dp/B0735CV8MB/ref=sr_1_6?s=storageorganization&ie=UTF8&qid=1531864526&sr=1-6&keywords=laundry+rack
I have been teaching myself book binding and experimenting with all kinds of different styles of books and lots of folding and new idea with paper. I am so in love with it all… So now I hoard paper and fabric 🙂
I have been doing my artwork/creating for many years. I used to want to try a new technique that I saw someone else do that I really liked. Lately I have looked over my past work and fell in love with certain techniques and images that I did long ago. I’m learning to trust myself more and more these days. I’m liking what came/comes from my heart. I’m more in tune with my own images and processes now.
I am revisiting garment making. I have had some fitting issues in the past and want to learn to make a muslin to make sure it fits.
I’m revisiting hand sewing – finishing up a boro scarf I started in a workshop last year. Also about to take a shot at recycling men’s shirts into women’s wear.
I have been dying and experimenting with alcohol inks for dying and painting. I also have been trying my hand with watercolor on fabric.
I’ve learned that it’s not only ok, but important to your growth, to take something and make it your own.
I’ve learned that experimenting again with machine stitch and paint on Lutradur brings beautiful results when heated. Lacy leaves, the amazing result.
I am working on improving my stitching skills…both hand stitching and machine free-motion.
I am revisiting Hand Work on a crazy quilt and loving it!
Simply that carving out time to work on art is the best stress relief around. I had put it aside for far too long.
Agreed, Claire. Hope you are doing well, it’s been a while!
My local quilt shop, Capital Quilts, Louanne Dr, Gaithersburg, MD is holding a Summer Quilt challenge, “Do You See What I See?” Each participant pulls a picture from a box without peeking. The person makes a 20” x 20” quilted wall hanging in response to the photograph. Quilt, inspiration photo and artist statement are due eight weeks from start date. This small quilt appealed for several reasons. It has been fun to design, small size is less costly for materials and a manageable size to find wall space to display.
I think it’s great they put both a size and time restriction on this challenge–forces you to just get going and not listen to that inner critic. That is a really fun challenge idea, picking an image out of a box!
I seriously downsized last year and had to think hard about what supplies to keep, and what to sell/donate. My new goal is to use what I’ve got without buying more! (or the least I can get by with to finish the project) So my creativity is currently inspired by the WWII “make do” movement! What’s surprising and exciting to me is how it’s forcing me to see new combinations of colors and materials, and how I’m using things in fun and odd ways. Funny how putting a limit on myself is actually expanding my creativity! PS Funny how I just checked out your blog last week ‘cause I’d missed hearing from you and wondered what you were up to! ha
Aloha!
I have been reading about making handmade paper. I have many rose petals that I couldn’t throw away. I’ve made potpourri for friends, and thought of making paper with them. I borrowed every book at the library and was amazed at the creativity. Since I have been making handmade books, some handmade paper will certainly enhance the pages.
Seeing your indigo dying results adds to the possibilities of using hand dyed cloth for book covers too.
You always have wonderful ideas. Thank you for sharing them. Aloha, pam
That sounds like so much fun, Pam!
This year I started taking classes to learn new techniques. There are a lot a new babies in my family recently, so I am using these new skills in making gifts for the little ones.
Did a workshop with Nick Coman from Dragonfly Dyeworks today on Simple Soy Wax Batik and can not wait to get home to ice some more batches.
Laura, that sounds like so much fun. Would love to see what you made!
At the moment I’m traveling and left all my quilting back home. So I’ve picked up some yarn and have several projects going… both knitting and crocheting.
I have to admit….I am new to dying fabric. Always afraid to I would ruin it. So what i have learned from watching the video….that it looks like so much fun! And that blue is so beautiful! Ready to jump in and try my hand at it!🤗💙
Indigo dyeing is truly so much fun..and EASY!
I continue to relearn that the hardest task to trying a new idea or getting started is taking that first step. I need to encourage myself to just start, perhaps with a warm up project. After that, the fun and creativity begins to flow.
I took a technique class at Sew and Save in Westerville and learned a bunch of new things that I can do with my sewing machine! How didn’t I know these wonderful techniques? I am experimenting with these now.
I have been on a trip to Smokie Mountains. Want to create a landscape scene with some of the pictures I have taken.
Your post! I tried indigo dyeing for the first time this year and you just reminded me that I need to make something cool with it. Now I want to make a T shirt like yours.
I have re-learned about the importance of daily writing to enhance creativity and productivity. It really helps!
Sashiko, I love the slow hand stitching for a unique accent.
I took an indigo dyeing course too. It would be fun to try at home with kit.
Hi Pokey,
I have gone back to basic color theory to enjoy and play with.
I have a bit of Crafters block lately, but have been exploring natural dyes that I can grow in my garden. Working on seed collection, so that I can grow things that will allow me to create some inspiring fabric next year. Love the indigo!
I’m trying junk and art journaling for the first time.
I am embarking on an all things colour trip this summer. Focusing on the idea of value and its importance in our work. This is leading me down the garden path literally as I look at value in nature, value in fabrics, value in my past work and value in my future work. It is also giving me an excuse to play with swatches of fabric and dyeing all summer long. What fun! Love how your indigo turned out.
My daughter and I have been going to regular tie dye events this summer. They have been really rushed! I would love for us to be able to take our time and create some cool designs!
I’ve recently taken a workshop where we tried indigo dyeing, I loved it and I’d love to do more. I’d like to try indigo dyeing paper!
I have revisited block carving for printing. I learned this as a kid and used to print the family’s Christmas cards yearly. Haven’t carved a block in years but inspiration struck so I dug out the tools and ordered some blocks. Thank heavens the materials are so much easier to work with now! Loving it! I just need some indigo dye to pull it all together!
I’ve bern working on a Wedding quilt for my daughter, married last 9-26-17. It was above my level of expertise but I’m learning so much. It’s a double wedding ring design. I dyed a sheet for the back, and learned free motion quilting. Crafted with love, not perfection.
Crafted with love is the best kind! I bet she will love it so much…
I learning how to Longarm with Martelli Bella. The automated system is great! Finically finishing some UFOs
I’ve learned to create happy accidents with dyes as a bridge to making new and unexpected shapes and colors.
I have been carving rubber stamps for fabric printing. Also doing Tula Pink’s 100 blocks City Sampler, one block a day. I am on day 9.
I recently attended a demo of carved wooden stamps on fabric. I had a great time. I loved the result. Want to do more.
My friend and I paint little birdhouses to hang in the trees around our senior complex. It inspires us to get busy. We’ve been using paper decoupage on roof and sides along with paint to give them a bit of a different look.
That sounds so cool…do you have pictures?
Great to find out about new products and how easy it is to try new techniques at a good price and not needing to invest in other tolls to try this tecnique
Revisiting or shall I say re-learning embroidery stitches I used as a child. As a kid I just Did…not thinking much about the length or preciseness. Loving it!
My daughter showed me how to cyanotype and rust dyeing to use in wall quilt. I can’t wait for the next unwrapping Always a surprise
Found inspiration looking through an old quilt book. One strip of fabric lead me to a discussion with my daughter what I wanted to do. She taught me how to cynaotype and rust dye. Ready to put them together
I have really been wanted to try cyanotypes…did it once very long ago but definitely want to get back to it!
About 10 yrs ago I had the opportunity to study a few times with some of the Gee’s Bend quilters. Thirty years ago I learned to quilt while living in New Hampshire. What I learned is that my love of stitching remains strong–as strong as it was when I first learned traditionally. The Gee’s Bend quilters brought me back to my roots.
I am trying to think outside the box and leave my comfort zone behind. I am trying to master one new skill at a time, and build a master toolbox. I am also brushing up skills I take for granted, and I’m trying to break bad habits.
After years of fused appliqué, pretty exclusively, I am rediscovering piecing and the great beauty of geography!
Would love to see what you are up to, Terry!
I have recently gone back to my love of natural dyeing through eco printing and dyeing. I am now adding natural coloring to that and can’t believe the colors I am achieving.
I have recently gone back to my love of natural dyeing through eco printing and dyeing. I am now adding natural coloring to that and can’t believe the colors I am achieving.
Sorry-didn’t mean to double post. Guess I’m really excited about eco dyeing!
Do you have pictures?
I have recently learned the therapy that is English Paper Piecing! I love that it’s something I can pick anytime anywhere and get a few pieces done!
EPP is a great thing to put into a baggie and take with you, isn’t it? I tend to do very simple EPP on the road–hexies.
I have recently learned that words can be used as both inspiration *for* designs and letters or parts of them can be elements *of* design.
This sounds really intriguing, Julie.
I have just recently learned how to ice dye using things purchased at the dollar store! Except for dye and fabric of course.
I’ve learned how to use my left hand (non dominant) to effectively doodle and do a variety of tasks. I broke my right wrist in April. I’m amazed at the abilities with my non dominant hand
That it something! I am sorry you broke your wrist! Ouch!
Right now my creativity has been fueled in a big way by taking on a project that is a little out of my comfort zone. While there are familiar elements (sewing, planning, designing, coming up with a production strategy),the creativity is being fueled by the surface design element of the project. I find myself time-traveling to my twenties to revive dyeing skills I had mastered then, and applying that with the latest art materials to achieve something I never thought I’d ever do. Fun, fun, fun!!