

Hope everyone had a great Fourth of July celebration yesterday! I spent my day quilting in my backyard:

My portable Gidget 2 sewing table that I wheeled onto my back porch and set my Bernina on for an afternoon of stitching.
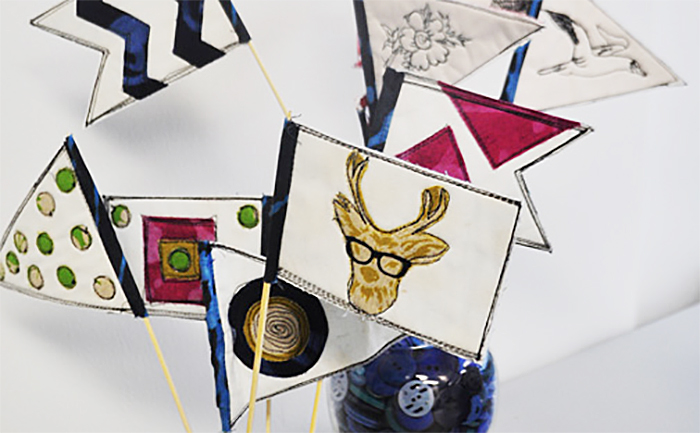
I thought about past July 4th celebrations, many of which I had spent on the water on my dad’s boat in the San Francisco Bay as a kid, and got the idea to make mini nautical quilt flags…

These were so fun to make, and only took a few hours!
Materials:
• 8.5″ x 11″ sheet of card stock
• Tracing pen or pencil
• 9″ x 12″ pieces of fabric. You will need one for the front, and one for the back. I chose plain white fabric for the front of the flag so I could thread paint designs as well as appliqué colorful pieces of fabrics.
• Fabric scraps for fusible appliqué.
• Fusible webbing (I used WonderUnder.)
• 9″ x 12″ piece of low loft batting or sheet of craft felt
•Fabric scissors, paper scissors
• Thread of choice (I used black thread.)
•Sewing machine with free-motion capabilities
• Iron and ironing pad
• Wooden skewers
Optional:
• For thread-painted designs: Small copy-right free illustrations from books, tracing paper, Sharpie pen, sewing pins. (If looking for copyright-free designs, look at the publications by Dover.)
• To make your flags curl: Stiffy Fabric Stiffener by Plaid, clothes pins, small paintbrush, small plastic container
Directions:
1. Draw flag shapes that are roughly 3″ x 5″ in size onto cardstock. I chose shapes found in nautical flags.
2. Fuse the top and backing fabric to the batting, and using card stock and a pen, trace the shapes onto the front fabric.

3. Cut fabrics that have fusible webbing applied to the back into small shapes and fuse to the front of the flags.

4. Now the fun part: stitching! Take your sheet of flags to your sewing machine and with a 1/4″ foot and black thread, outline the flags with a straight stitch. Stitch around each flag a few times to give them a little doodling flair. Then with a free-motion foot and your feed dogs dropped, doodle around your appliquéd designs.

5. If you want to create thread-painted designs, trace the designs onto tracing paper, cut loosely around the traced design with your paper scissors, and pin to the top of the flag. Using a free-motion foot with your feed dogs dropped, begin stitching the design. Once done, take a sewing pin and carefully scrape away the tracing paper from the stitched design.


6. When all of your flag shapes are fully stitched, carefully cut them out.

7. Now it’s time to add a sleeve for your wooden skewer. Simple cut a scrap of fabric (with no fusible on it) the width of the flag side you want the skewer to go through. Using a 1/8″ seam allowance, straight stitch the fabric scrap to the front of the flag, right sides together. Cut the excess thread, then pull the sleeve to the back of the flag and stitch it in place again using a scant 1/8″ seam allowance. Once finished, cut excess sleeve fabric as close to the stitched line as possible.

Poll sleeve has already been stitched on the front of the flag. Here it has been pulled around to the back, and is being stitched in place to create the tiny sleeve for the wooden skewer to slide through.
8. Stick your wooden skewers through the sleeves and set the flags into a little glass jar filled with buttons, beads, or other embellishments that will keep the flags in place.

9. If you want your flags to stay curled like they are blowing in the wind, you can use Stiffy Fabric Stiffener. Simply pleat the flag and use clothes pins to keep the pleats in place. Set the flags over a tiny plastic container, and apply the Stiffy Fabric Stiffener with a paintbrush. Paint the flags liberally, making sure to get into the creases. Let them dry overnight, then remove the clothes pins.


Example of curled flag on the lower left (the red and white striped flag).
All in all making these mini quilted flags was so much fun, and I am going to make fresh ones each season. Next up: a bouquet of fall harvest flags– pumpkins, witches on brooms, a full harvest moon, thread-painted candy corn images… the list goes on and on!
When I was finished with my mini quilt flag project yesterday, it was time to relax on my new chaise lounge with a chilled margarita. I love summer…


Recent Comments