Pokey Bolton - Thoughts on Crafting A Life
Home
About
  • Home
  • About
Pokey Bolton - Thoughts on Crafting A Life
Quilt Tutorial

Wine Coaster & Mug Rug Tutorial

quilted wine coasters

Wine coasters made with coordinating quilt fabrics, making it easy to distinguish whose glass belongs to whom. Fabric line is “Reunion” by Sweetwater Fabrics for MODA.

A parent’s job educating their offspring is never done, even if said youngin’ is earning a living, paying bills, and in her 40’s. My mom came to visit me this past weekend and guess what she taught me to make?  Wine coasters that when flipped over, can serve double duty as mug rugs. Well…mug rugs are technically large enough to fit a coffee mug and a small snack…which these don’t. So I guess they are mug rugs for dieters! Point being, you can tuck the bottom of a wine glass inside one side, flip them over, and rest a coffee mug on the other. There are various tutorials on the Internet for these, but my mom adapted the size, doesn’t quilt the bottom fabric, and also makes them sans pinning so it goes a bit faster.

Materials (for one coaster)

• 5 coordinating fabrics, each at least 6″ square (Note: Choose fabrics with small-scale prints, otherwise you wont be able to see the full print on the wine coaster side since it consists of four folded fabrics.)

• Sewing machine loaded with monofilament thread in the top and in the bobbin

• 1/4″ sewing foot

• Iron and ironing board

• Fabric scissors, marking tool,  and a 5″ circle template (or an AccuQuilt GO!  fabric cutter with the 5″ circle die cut)


Directions

1. Take your five fabrics and cut them into 5″ circles, making sure they are all exactly 5″ in diameter.

2. Choose your bottom fabric (the coffee coaster side) and lay it right-side up.

backing right side up

3. Take your other four fabrics that have been cut into 5″ circles, fold each of them in half with wrong sides together (right sides out), and press.

4. Take your first folded circle and lay it on top of the bottom fabric.

step 1 fold

5. Lay your second folded circle 90 degrees on top of the first.

Step 2 fold


6. Continue with the third folded circle, laying it on top of the second folded circle at a 90-degree angle.

Step 3 fold


7. Lay the fourth and final folded circle on top, tucking half of it underneath the first folded circle.

tucking 4th under 1st

Here’s how it should look, making sure the top four folded fabrics are perfectly aligned with the backing fabric circle:

4 folded for sewing


Make sure there is a small square hole in the middle, as this is where the base of the wine glass goes into, and where you will turn everything right sides out once finished sewing. See the small square hole in the middle in the picture below?

Ready for sewing


8. Very carefully take this sandwich to your sewing machine and with a 1/4″ seam, stitch all the way around the perimeter, stitching it entirely closed.

sewing


8. Once stitched entirely closed, with the small square opening, pull all of the folded fabrics through and turn right sides out. Press.

finished

These make great gifts and housewarming presents. Thanks for the polka dot coasters, Mom. Very thoughtful!

polka dot wine coasters

I will be bringing a dozen of these coasters/ mug rugs to trade at our Trading Wall at International Quilt Festival/Long Beach later this week. Hope to see you there!
wine coasters with MODA fabrics


July 29, 2013by Pokey Bolton
FacebookTwitterPinterestGoogle +Stumbleupon
Quilt Tutorial

My Weekend in Pictures: From Photograph to Thermofax Screen

I had a very industrious weekend. Saturday was filled with sunshine and photographic possibilities whereas Sunday was steeped in rain, which meant for a lot of indoor creative endeavors.

My weekend in pictures:

My night water lily. It is a little groggy to close in the morning, so I can usually catch it still in full bloom at 6:00 AM.

A hibiscus blossom greeting me first thing in the morning.

Plumeria! This flower is so fragrant, not to mention velvet to the touch.

A water lily, just waking up and spreading her petals to embrace the day. I thought this might make for a nice Thermofax screen, so I imported the image into my computer.

I used the magnetic lasso tool in Photoshop to focus on the central flower shape.

I then dragged the flower to a white background.

Using the photocopy tool in the filter menu, I turned the full-color image to a black and white rendition.

Then I opened a new file in Photoshop and dragged three of these flowers to create a row. Later, I copied this row a couple of times so I had a sheet of three rows of waterlilies.

I then printed the sheet of waterlilies on my inkjet printer, placed a piece of screening material on top, and ran them through the carrier of my Thermofax machine. The bulb in my Thermofax machine heated up both sheets, and where the black carbon ink appears on the sheet of paper, it melted the screening material, creating the graphic impression on the screen.

I usually run the print and the screening material at least three passes through my Thermofax machine to make sure the image took on the screening material.

I chose pink paint to screen the images onto a rich lime green background. I created about 1/4 yard of fabric with this image, and screened with a variety of colors.

I had an idea to incorporate this piece to create a stitched cover for a recycled aluminum can to hold my watercolor pencils.

And here it is: my new watercolor pencil holder. I guess I should make greater strides to keep a sketchbook now!

When I was done, I experimented in the kitchen and made  spinach and parmesan dumplings in a ginger broth:

I enjoyed a nice couple of quiet days. Did you stitch or quilt this past weekend?

July 9, 2012by Pokey Bolton
FacebookTwitterPinterestGoogle +Stumbleupon
Quilt Tutorial

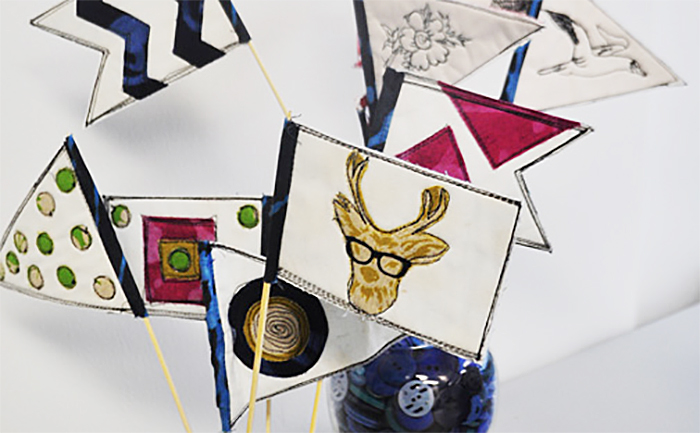
Easy Afternoon Quilt Project: Mini Quilt Flags

Hope everyone had a great Fourth of July celebration yesterday! I spent my day quilting in my backyard:

My portable Gidget 2 sewing table that I wheeled onto my back porch and set my Bernina on for an afternoon of stitching.

I thought about past July 4th celebrations, many of which I had spent on the water on my dad’s boat in the San Francisco Bay as a kid, and got the idea to make mini nautical quilt flags…

These were so fun to make, and only took a few hours!

Materials:

• 8.5″ x 11″ sheet of card stock

• Tracing pen or pencil

• 9″ x 12″ pieces of fabric. You will need one for the front, and one for the back. I chose plain white fabric for the front of the flag so I could thread paint designs as well as appliqué colorful pieces of fabrics.

• Fabric scraps for fusible appliqué.

• Fusible webbing (I used WonderUnder.)

• 9″ x 12″ piece of low loft batting or sheet of craft felt

•Fabric scissors, paper scissors

• Thread of choice (I used black thread.)

•Sewing machine with free-motion capabilities

• Iron and ironing pad

• Wooden skewers

Optional:

• For thread-painted designs:  Small copy-right free illustrations from books, tracing paper, Sharpie pen, sewing pins. (If looking for copyright-free designs, look at the publications by Dover.)

• To make your flags curl: Stiffy Fabric Stiffener by Plaid, clothes pins, small paintbrush, small plastic container

Directions:

1. Draw flag shapes that are roughly 3″ x 5″ in size onto cardstock. I chose shapes found in nautical flags.

2. Fuse the top and backing fabric to the batting, and using card stock and a pen, trace the shapes onto the front fabric.

3. Cut fabrics that have fusible webbing applied to the back into small shapes and fuse to the front of the flags.

4. Now the fun part: stitching! Take your sheet of flags to your sewing machine and with a 1/4″ foot and black thread, outline the flags with a straight stitch. Stitch around each flag a few times to give them a little doodling flair. Then with a free-motion foot and your feed dogs dropped, doodle around your appliquéd designs.

5. If you want to create thread-painted designs, trace the designs onto tracing paper, cut loosely around the traced design with your paper scissors, and pin to the top of the flag. Using a free-motion foot with your feed dogs dropped, begin stitching the design. Once done, take a sewing pin and carefully scrape away the tracing paper from the stitched design.

6. When all of your flag shapes are fully stitched, carefully cut them out.

7. Now it’s time to add a sleeve for your wooden skewer. Simple cut a scrap of fabric (with no fusible on it) the width of the flag side you want the skewer to go through. Using a 1/8″ seam allowance, straight stitch the fabric scrap to the front of the flag, right sides together. Cut the excess thread, then pull the sleeve to the back of the flag and stitch it in place again using a scant 1/8″ seam allowance. Once finished, cut excess sleeve fabric as close to the stitched line as possible.

Poll sleeve has already been stitched on the front of the flag. Here it has been pulled around to the back, and is being stitched in place to create the tiny sleeve for the wooden skewer to slide through.

8. Stick your wooden skewers through the sleeves and set the flags into a little glass jar filled with buttons, beads, or other embellishments that will keep the flags in place.

9. If you want your flags to stay curled like they are blowing in the wind, you can use Stiffy Fabric Stiffener. Simply pleat the flag and use clothes pins to keep the pleats in place. Set the flags over a tiny plastic container, and apply the Stiffy Fabric Stiffener with a paintbrush. Paint the flags liberally, making sure to get into the creases. Let them dry overnight, then remove the clothes pins.

Example of curled flag on the lower left (the red and white striped flag).

All in all making these mini quilted flags was so much fun, and I am going to make fresh ones each season. Next up: a bouquet of fall harvest flags– pumpkins, witches on brooms, a full harvest moon, thread-painted candy corn images… the list goes on and on!

When I was finished with my mini quilt flag project yesterday, it was time to relax on my new chaise lounge with a chilled margarita. I love summer…

Save

July 5, 2012by Pokey Bolton
FacebookTwitterPinterestGoogle +Stumbleupon

About Me

pokey-art-barn

Welcome. I’m Pokey Bolton, founder of Quilting Arts and Cloth Paper Scissors magazines, and Founding Host of Quilting Arts TV on PBS. With my experience in publishing, media, events, and craft adventures (by land and sea), I fairly recently founded Crafting a Life, LLC...

...read more

Save

Save

Save

Save

Subscribe to this Blog

Enter your email address to subscribe and get email notifications when we post something new!

Recent Posts

  • A Year of Renovations: Part 1 (Update from Pokey)
  • A Recap of My 2021, (a.k.a Part II of 2020)
  • My Quilty Wedding (Part 1)
  • What a Difference a New Year Makes & What She Wanted
  • A Pandemic, Fires, Relentless Smoke, and … Gratitude?

Recent Comments

  • Randy on Celebrating Allison Stilwell: Do What You Love
  • Eanrwyg on My Art Barn Reveal-Come on in!
  • Lisa Warner on A Year of Renovations: Part 1 (Update from Pokey)
  • Lisa Warner on Cover Chosen, Thanks to You–Playful Fabric Printing
  • Lisa Warner on Help Me Choose a Book Cover

Categories

  • Art Barn
  • Charity and Fundraising
  • Craft Napa
  • Crafting A Life
  • General News
  • Indigo Dyeing
  • Pet Projects
  • Playful Fabric Printing
  • Pokey Bolton
  • Publishing
  • Q & A
  • Quilt Retreat
  • Quilt Studio Pets
  • Quilt Tutorial

“I am Pokey Bolton, founder of Crafting a Life, LLC, Quilting Arts and Cloth Paper Scissors magazines, and Founding Host of Quilting Arts TV on PBS. Welcome to my thoughts on Crafting a Life.”

© 2017 copyright Pokey Bolton All Rights Reserved